Location-Based Push Notifications: Building Your Own Notification Infrastructure from Scratch
Hi everyone, in this article I'll walk you through, step by step, how I built a scalable, location-based notification system for mobile apps that connects directly to the APNs and FCM APIs.
When developers think of push notifications, third-party services like OneSignal, Firebase Cloud Messaging, Braze, or Dengage are usually the first tools that come to mind. While these platforms are great for a quick start, when your requirements evolve into "Send dynamic notifications based on the user's real-time location", achieving the desired level of flexibility, accuracy, and performance with ready-made solutions becomes extremely challenging.
For applications operating with Precise Location data—such as career platforms, delivery tracking, field operations, or local deals—this requirement becomes unavoidable: When a new item or event is published on the backend, you need to match it with active users within a specific radius and trigger an instant geo-targeted push notification.
Together, we'll look at how I built an infrastructure from scratch that connects directly to the APNs and FCM APIs, securely collects real-time location from the device, and sends location-based notifications in the background. We'll examine the architecture on both the React Native (mobile) and NestJS (backend) sides, with code examples you can use in a real project.
When Should You Build Your Own Notification System?
Here are the primary reasons to build a custom notification pipeline instead of relying on third-party services:
- Content-Based Location Targeting: Tools like OneSignal or Braze typically rely on client-side geofencing: You draw a static geographical boundary beforehand, and the device triggers an event when entering that area. However, if your goal is to publish new content (a new job listing, dynamic deal, or delivery update) and query your backend for "Which active users are currently within X km of this content?" to send automated push notifications, no out-of-the-box third-party service provides this content-triggered geo-matching workflow.
- Cost Control: Third-party services often use pricing models that scale rapidly with Monthly Active Users (MAU) or notification volume. By connecting directly to APNs and FCM, your notification delivery pipeline operates with zero third-party licensing fees.
- Data Ownership and Privacy: Device metadata, real-time location histories, and notification preferences remain strictly inside your own database rather than being transmitted to third-party servers.
- Flexibility and Full Control: You gain complete freedom to implement silent pushes, multi-app credential management, custom retry mechanisms, and advanced rate limiting without third-party platform constraints.
- Vendor Lock-in Independence: You retain full ownership of your architecture, making it easy to migrate across cloud providers or extend custom business logic whenever needed.
Architectural Overview
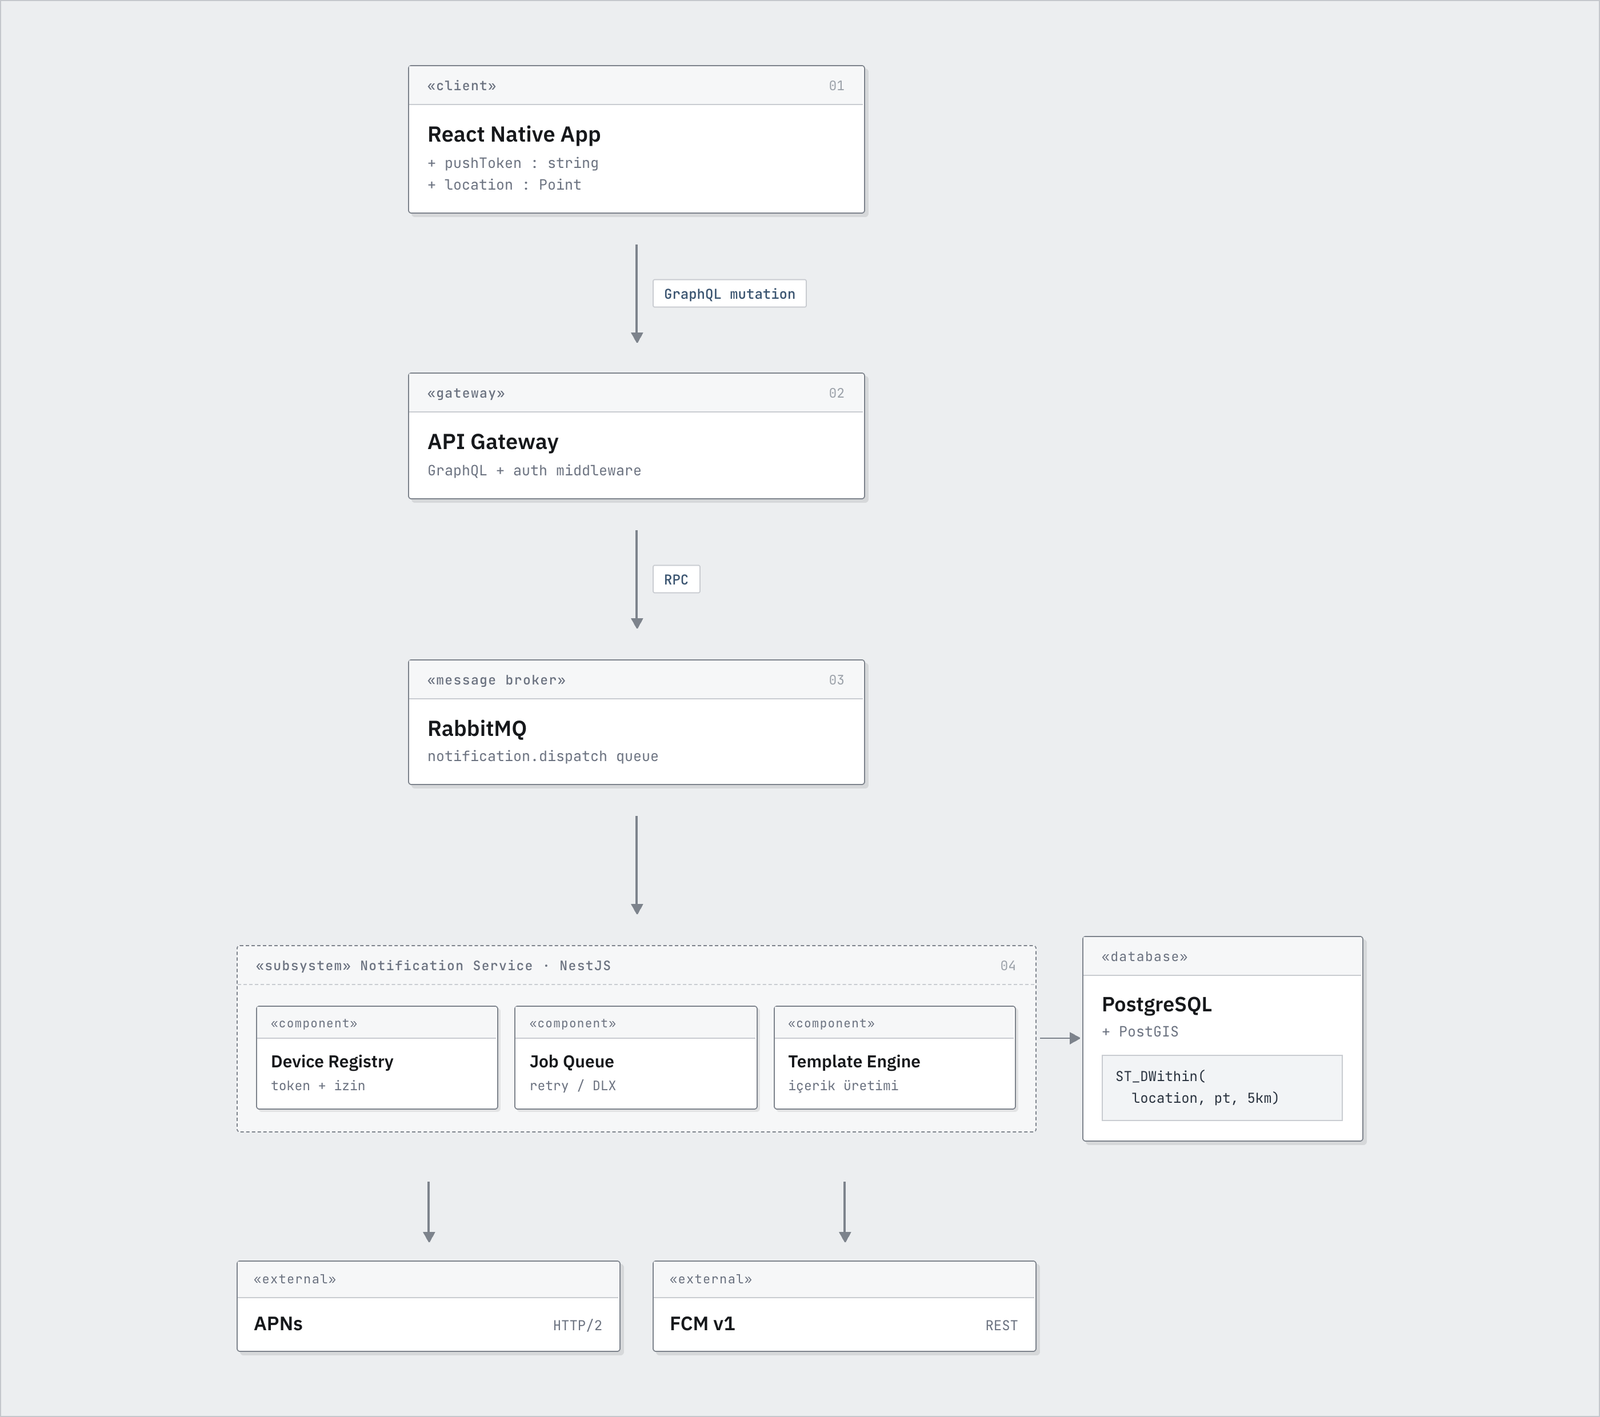
The system consists of three primary components: Mobile Client (React Native), API Gateway (GraphQL), and an Independent Notification Microservice (NestJS). Communication between backend services is handled asynchronously via RabbitMQ using an event-driven architecture.
Major technology companies like Uber, Netflix, LinkedIn, and Slack adopt this exact pattern by running custom notification pipelines directly attached to APNs and FCM. Uber's RAMEN platform and Netflix's RENO system are well-known examples of this design.
Mobile Side: Device Registration and Token Management
The mobile side of the push notification pipeline has three core responsibilities: Requesting permissions, acquiring platform tokens, and synchronizing state with the backend. We encapsulate this complete lifecycle within a global React PushProvider component.
1. Persistent Device ID
Every device must have a unique, stable record in our database. However, standard OS calls like DeviceInfo.getUniqueId() can reset under certain edge cases (e.g., app reinstalls). To solve this, we enforce a two-tier persistence layer using OS secure storage:
import Keychain from 'react-native-keychain';
import DeviceInfo from 'react-native-device-info';

const KEYCHAIN_SERVICE = 'com.yourapp.device.id';
const KEYCHAIN_ACCOUNT = 'device_id';

export const getOrCreatePushDeviceId = async (): Promise<string | null> => {
  // 1. Attempt reading from Keychain / Keystore (Persists across reinstalls)
  const stored = await Keychain.getGenericPassword({
    service: KEYCHAIN_SERVICE,
  });
  if (stored && stored.password) {
    return stored.password;
  }

  // 2. Fallback to OS ID and save to Keychain
  const osDeviceId = await DeviceInfo.getUniqueId();
  if (osDeviceId) {
    await Keychain.setGenericPassword(KEYCHAIN_ACCOUNT, osDeviceId, {
      service: KEYCHAIN_SERVICE,
      accessible: Keychain.ACCESSIBLE.ALWAYS,
    });
    return osDeviceId;
  }

  return null;
};
Note: On iOS, Keychains retain stored keys even if the application is uninstalled and reinstalled under the same provisioning profile. Android's Keystore provides similar hardware-backed persistence. This ensures returning users retain their existing device entity ID.
2. Token Acquisition: APNs vs FCM
iOS and Android follow different workflows for fetching push tokens. On iOS, we request native APNs tokens directly. Because iOS might not yield an APNs token immediately during a cold start, we wrap token retrieval in a retry mechanism:
import messaging, { AuthorizationStatus } from '@react-native-firebase/messaging';
import { Platform } from 'react-native';

export const getPushToken = async () => {
  if (Platform.OS === 'ios') {
    const status = await messaging().hasPermission();
    if (status === AuthorizationStatus.NOT_DETERMINED) {
      await messaging().requestPermission();
    }

    await messaging().registerDeviceForRemoteMessages();
    const apnsToken = await getApnsTokenWithRetry();
    return { pushProvider: 'APNS', pushToken: apnsToken };
  }

  // Android: Fetch FCM token directly
  const fcmToken = await messaging().getToken();
  return { pushProvider: 'FCM', pushToken: fcmToken };
};
3. PushProvider: Orchestration Layer
The PushProvider component ties the mobile lifecycle together. It synchronizes device state on app boot, token refresh events, authentication state changes, and active foreground transitions:
import React, { useEffect } from 'react';
import { AppState } from 'react-native';
import messaging from '@react-native-firebase/messaging';

export const PushProvider: React.FC<{ children: React.ReactNode }> = ({ children }) => {
  const { isAuthenticated } = useAppSelector(state => state.auth);
  let lastCheck = 0;

  // 1. App boot-up sync
  useEffect(() => {
    requestNotificationPermission();
    syncDevice(undefined, { reason: 'boot' });
  }, []);

  // 2. Firebase token refresh listener
  useEffect(() => {
    return messaging().onTokenRefresh(() => {
      syncDevice(undefined, { reason: 'token-refresh' });
    });
  }, []);

  // 3. Clear user association on logout
  useEffect(() => {
    if (!isAuthenticated) {
      syncDevice(null, { reason: 'auth-reset' });
    }
  }, [isAuthenticated]);

  // 4. Foreground transition sync (throttled by 30 seconds)
  useEffect(() => {
    const sub = AppState.addEventListener('change', state => {
      if (state !== 'active') return;
      if (Date.now() - lastCheck < 30000) return;

      lastCheck = Date.now();
      syncDevice(undefined, { reason: 'app-active' });
    });
    return () => sub.remove();
  }, []);

  return <>{children}</>;
};
4. Deduplication: Eliminating Unnecessary API Requests
To prevent redundant network requests from mobile clients, we hash device payload properties (model, OS, permission states, coordinates, push token) into a "Payload Signature". If the computed signature matches the previous signature saved in local storage (AsyncStorage/MMKV), the network call is skipped entirely:
const signature = createPayloadSignature(payload);
const lastSignature = await storage.getItem(STORAGE_KEYS.PUSH_LAST_SYNC_SIGNATURE);

if (lastSignature === signature && registrationId) {
  return payload; // No state change; skip network request
}
Dynamic attributes like
syncedAttimestamps are excluded during signature generation so that network calls trigger strictly when real state changes occur (token updates, location shifts, permission toggles).
5. Network Middleware and Retry Strategy
- Apollo Client Middleware: Every outbound GraphQL request attaches a
cx-device-idheader. If the client lacks a valid registration ID, an automatic background device sync is triggered. - Exponential Backoff + Jitter: Failed requests or unready tokens invoke a retry backoff schedule (
5s -> 15s -> 45s -> 2m -> 5m). A 15% randomized jitter is applied to avoid thundering herd problems when thousands of devices reconnect simultaneously.
6. Native Configuration Notes
iOS Configuration:
- Entitlements: Set
aps-environmenttodevelopmentorproductiondepending on the build target. - AppDelegate: Ensure
FirebaseApp.configure()is initialized. APNs delegate methods are automatically handled via method swizzling inside@react-native-firebase/messaging. - GoogleService-Info.plist: Must be downloaded from the Firebase Console and added to the Xcode project root.
Note: We do not use third-party libraries like
react-native-permissionsfor push permissions on iOS. Firebase Messaging manages iOS native permission prompt lifecycles natively.
Android Configuration:
Add google-services.json to the app directory and specify WAKE_LOCK permissions inside AndroidManifest.xml:
<uses-permission android:name="android.permission.WAKE_LOCK" tools:remove="android:maxSdkVersion" />
The attribute tools:remove="android:maxSdkVersion" is critical: It allows Firebase's ReactNativeFirebaseMessagingReceiver to maintain background processing continuity on Android 8.0+ (API 26+). For Android 13+ (API 33), standard runtime permission requests via PermissionsAndroid.request(POST_NOTIFICATIONS) suffice.
Backend Layer: Direct APNs and FCM Integration
The backend is built as an independent microservice using NestJS. The notification service operates in isolation, receiving triggers from the main application via RabbitMQ.
1. APNs Integration: Native HTTP/2 and JWT
Instead of third-party wrapper SDKs, we connect directly to Apple APNs servers using Node.js's native http2 module. Authentication uses JWT signed with the ES256 algorithm:
import * as http2 from 'http2';
import * as jwt from 'jsonwebtoken';
import * as fs from 'fs';

export class ApnsProvider {
  private cachedToken: string | null = null;
  private tokenExpiresAt: number = 0;

  private getJWT(creds: ApnsCredentials): string {
    const now = Math.floor(Date.now() / 1000);
    // Reuse token if still valid (cached for 50 minutes)
    if (this.cachedToken && now < this.tokenExpiresAt) {
      return this.cachedToken;
    }

    const privateKey = fs.readFileSync(creds.keyPath, 'utf8');
    this.cachedToken = jwt.sign({}, privateKey, {
      algorithm: 'ES256',
      keyid: creds.keyId,
      issuer: creds.teamId,
      expiresIn: '1h',
    });
    this.tokenExpiresAt = now + 50 * 60;

    return this.cachedToken;
  }

  async sendNotification(deviceToken: string, payload: any, creds: ApnsCredentials) {
    const host = process.env.NODE_ENV === 'production'
      ? 'api.push.apple.com'
      : 'api.sandbox.push.apple.com';

    const client = http2.connect(`https://${host}`);
    const token = this.getJWT(creds);

    const req = client.request({
      ':method': 'POST',
      ':path': `/3/device/${deviceToken}`,
      'authorization': `bearer ${token}`,
      'apns-topic': creds.bundleId,
      'apns-push-type': payload.silent ? 'background' : 'alert',
      'apns-priority': payload.silent ? '5' : '10',
    });

    req.write(JSON.stringify(payload));
    req.end();
  }
}
JWT Caching Strategy: APNs JWTs remain valid for 1 hour. To avoid the signing overhead on every single notification, we cache the JWT in memory for 50 minutes. Tokens are cached by a
keyId:teamIdkey, enabling a single backend instance to manage multiple iOS apps concurrently.
2. FCM Integration: v1 HTTP API
For Android, we use the FCM v1 HTTP API rather than legacy FCM server keys. The v1 API authorizes requests via OAuth2 Access Tokens and allows fine-grained platform payload customization:
import { GoogleAuth } from 'google-auth-library';

export class FcmProvider {
  async sendNotification(deviceToken: string, payload: any, projectId: string, serviceAccountPath: string) {
    const auth = new GoogleAuth({
      keyFile: serviceAccountPath,
      scopes: ['https://www.googleapis.com/auth/firebase.messaging'],
    });

    const client = await auth.getClient();
    const accessToken = await client.getAccessToken();

    const response = await fetch(
      `https://fcm.googleapis.com/v1/projects/${projectId}/messages:send`,
      {
        method: 'POST',
        headers: {
          'Authorization': `Bearer ${accessToken.token}`,
          'Content-Type': 'application/json',
        },
        body: JSON.stringify({
          message: {
            token: deviceToken,
            notification: {
              title: payload.title,
              body: payload.body,
            },
            android: {
              priority: 'high',
              notification: { sound: 'default' },
            },
          },
        }),
      }
    );

    return response.json();
  }
}
3. Payload Schema Differences
APNs and FCM v1 accept different JSON structures. Our backend mapper service accepts unified message objects and formats platform-specific payloads accordingly:
iOS (APNs Payload):
{
  "aps": {
    "alert": {
      "title": "New opportunity nearby!",
      "body": "New content has been published near your area."
    },
    "sound": "default"
  }
}
Android (FCM v1 Payload):
{
  "message": {
    "token": "fcm_device_token_xyz",
    "notification": {
      "title": "New opportunity nearby!",
      "body": "New content has been published near your area."
    },
    "android": {
      "priority": "high",
      "notification": {
        "sound": "default"
      }
    }
  }
}
4. Multi-App Support (Credential Resolver)
Our microservice can serve multiple mobile applications simultaneously via a PushCredentialResolver component.
Resolution hierarchy: platform:appId -> appId -> global env. If a specific configuration is missing, the resolver falls back safely to default environment variables.
Location-Based Notifications: Our Architectural Advantage
What sets this custom setup apart from third-party services is our real-time location ingestion and server-side geo-matching pipeline.
Data Collected During Device Registration
Every synchronization step captures structured client metadata:
| Category | Attributes Collected |
|---|---|
| Identity | deviceId, platform, pushProvider, pushToken, userId |
| App | appId, appVersion, buildNumber |
| Device | phoneType, deviceModel, manufacturer, osName, osVersion, osApiLevel |
| Network / Locale | timezone, locale |
| Permissions | permissionStatus, appNotificationsEnabled, platform flags |
| Location | latitude, longitude, accuracy, capturedAt |
Storing and Querying Location Data
On the database level, location data can be stored in any relational or time-series database (e.g., PostgreSQL) using your choice of ORM or query builder (Prisma, TypeORM, Entity Framework, SQL, etc.).
The core architectural pattern is to avoid overwriting a single location cell. Instead, store location history using a time-series / snapshot approach (e.g., retaining the last 10 snapshots per device). This allows you to answer both "Where is the user right now?" and "Where has the user been over the last 2 hours?".
model NotificationDeviceLocationSnapshot {
  id             String   @id @default(dbgenerated("uuidv7()")) @db.Uuid
  registrationId String   @db.Uuid
  latitude       Float
  longitude      Float
  accuracy       Float
  capturedAt     DateTime @db.Timestamptz(3)
  createdAt      DateTime @default(now()) @db.Timestamptz(3)

  registration NotificationDeviceRegistration @relation(fields: [registrationId], references: [id], onDelete: Cascade)

  @@index([registrationId, capturedAt(sort: Desc)])
}
For spatial distance calculations, you can implement the Haversine formula as a pure mathematical function in TypeScript or your backend language of choice:
const EARTH_RADIUS_KM = 6371;
const toRadians = (degrees: number) => (degrees * Math.PI) / 180;

export function haversineDistanceKm(
  from: { latitude: number; longitude: number },
  to: { latitude: number; longitude: number }
): number {
  const deltaLat = toRadians(to.latitude - from.latitude);
  const deltaLon = toRadians(to.longitude - from.longitude);
  const fromLat = toRadians(from.latitude);
  const toLat = toRadians(to.latitude);

  const a =
    Math.sin(deltaLat / 2) ** 2 +
    Math.cos(fromLat) * Math.cos(toLat) * Math.sin(deltaLon / 2) ** 2;

  return 2 * EARTH_RADIUS_KM * Math.asin(Math.min(1, Math.sqrt(a)));
}
How Is a Notification Triggered?
- Location is updated: Whenever the app comes to the foreground or the user's location changes, the current location is sent to the backend.
- Nearby users are found: When new location-based content is added to the system (e.g., a new listing in Kadıköy), a background service finds the active devices whose last known location is within
X kmof that point. - Notifications are sent: Notifications are delivered to the matched users in parallel through a RabbitMQ queue.
This flow can't be built with off-the-shelf services, because none of them match users by location at the moment content is published.
Required Files and Credential Management
Here is the reference summary of credentials required for direct integration:
| File / Key | Source | Purpose |
|---|---|---|
| `.p8` (APNs Key) | Apple Developer -> Keys | Used to sign APNs JWT authorization tokens. |
| `GoogleService-Info.plist` | Firebase Console -> iOS App | Configures iOS Firebase SDK connections. |
| `google-services.json` | Firebase Console -> Android App | Configures Android Firebase SDK connections. |
| `fcm.json` (Service Account) | Google Cloud Console -> IAM | Generates OAuth2 access tokens for FCM v1 API. |
.p8 vs .p12 Note: Apple offers two authentication types. Legacy
.p12certificates require annual renewals. The.p8token-based approach never expires and allows a single key to authorize push notifications across all your iOS applications.
Conclusion
Building your own notification infrastructure may seem hard at first, but the APNs and FCM APIs are quite straightforward. What really matters is designing processes like token management, error handling, and location matching with the right architecture.
So what do we gain in return?
- Data Ownership: User data and location history stay completely under your control.
- Cost Control: You avoid monthly license fees that grow as your device and notification counts increase.
- Content-Based Location Targeting: You can freely build dynamic, location-based notification scenarios that off-the-shelf services don't offer.
If you're also planning to build an infrastructure that brings location and notifications together in your app, I hope this article serves as a good starting point. Thanks for reading, and feel free to get in touch with me if you have any questions or suggestions.